Showing posts with label baking. Show all posts

Tuesday, 22 May 2012

Wontons and Mini Quiche


Alright! Today we're making wontons (or Jiǎozi as they're properly known. Actually what we're cooking are Gyōza, the Japanese version, because we're using garlic and such, but the wrappers should be thinner if we're going Japenese authentic. I get geeky about this stuff. Let's just call them wontons.)  and using the leftover gunk to make mini quiches, the best kind of quiches. 

Wonton preparation takes a while, so be sure to make an absolutely massive batch. Use the wontons in soups (boiled ones only) salads, lunch boxes over rice and for dipping in soy sauce or sweet chilli sauce.

Ingredients:
Happy little package of convenience!
  • Three turkey breasts (or equivalent in just about any light meat)
  • Three spring onions
  • A cup of chopped bacon bits or cured ham if you're fancy (to counteract the healthy blandness of the turkey)
  • One tablespoon oyster sauce
  • 1tsp crushed garlic
  • 1 tsp crushed (and chopped) chilli
  • Wonton wrappers from the local asian supermarket 
    • Look, I know you can make your own. I've done it. But these ones come in a lovely little packet and don't make a mess. If you really want to, it's just flour (preferably rice flour) and water. Go wild.
  • 2 eggs (one for the mixture, one for sealing the wontons)
Extra ingredients for the quiche:
  • Plain flour
  • Some kind of butter, stork or (at a push) animal fat
  • Another egg. I sure do love cholesterol in my cooking

Method:
  1. Prepare wonton filling
    1. Cut the meat like it owes you money. Seriously, as finely as you possibly can. It should look disgracefully not-meat-like by the end. If you have big lumps, they will make your wontons burst while cooking, and then that mix will stick to other wontons so even the successful wontons will remind you of your past failures
    2. Chop the spring onions finely and add to the bowl, season with salt and pepper
    3. Add 2 teaspoons of crushed garlic and 2 of crushed chilli, according to taste, and 1 tablespoon of oyster sauce. If you don't have oyster sauce, mix a tablespoon of soy sauce with a pinch of sugar and enough cornstarch to form the consistency of tomato ketchup, and add that
  2. Wontons, Assemble!

  3. Prussian Efficiency
    1. Assemble in batches. Put a teaspoon of filling in the middle of the wonton wrapper
    2. Beat an egg in a seperate dish and smear it around the outside with your finger while trying to take pictures/use a pastry brush like a responsible adult
    3. Fold in half and crimp the edges. Here are three pictures of valid ways of crimping the edges. The one with the fork most shouts "White girl cooking Chinese food" so that's what I generally go with. Also it reminds me of delicious pies
      Words can't bring them down, oh no no.

  4. Cook wontons
    1. Fill a kettle with boiling water and add a splash of soy sauce to help with flavour
    2. Lower wontons in carefully with a slotted spoon
    3. Boil them until the last wonton has risen to the top of the pan (Protip: Lay a wooden spoon over the pan to stop thing accidentally boiling over. If you work on gas, make sure to line it up with the handle of your pan or you'll burn it and everyone will laugh at your foolish error)
    4. Drain in a colander

This is how I like my wontons:
Pure and delicious, almost healthy
This is how my little sister likes hers.
All you have to do is pan fry after boiling-
gives them a nice crispy skin, for easier
dipping


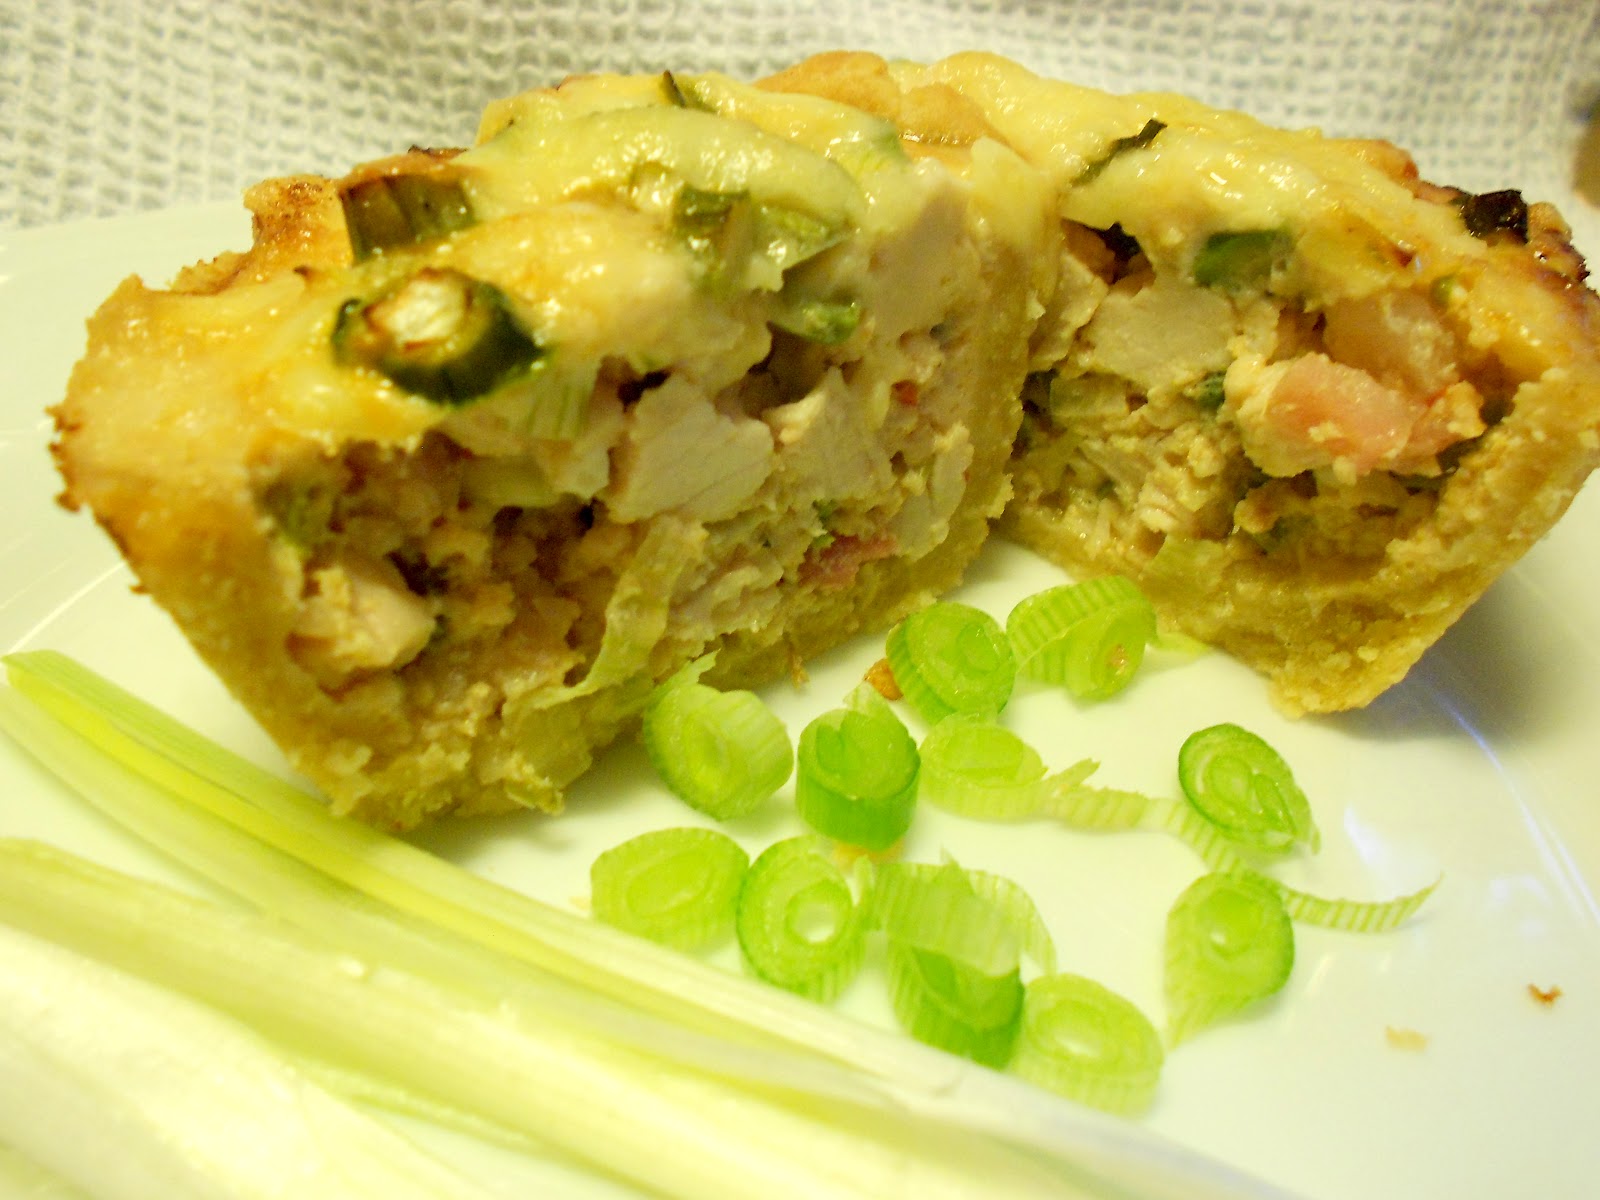
Great! You've got wontons! And a whole bowl of wonton mixture left over! Fortunately, wonton mixture is basically the same as quiche mixture. If you're very foreign and don't know what a quiche is, it's an omelette pie. Am I making this sound glamorous? Quiche is manly, let's go.

Preheat the oven to 190C (374F), add the rest of the egg you used to seal the wontons to the bowl of slop and quickly knock up some short crust pastry:
Rolling pins are for losers
(this recipe only)
  1. Guesstimate the volume of pastry you want and put about half as much flour as that in a bowl. It's better to be over than under. Also add a generous pinch of cayenne pepper- this makes cracking pastry
  2. Add half as much fat as there is flour (stork or butter is best-- steer clear of anything that claims to be healthy) and rub in with your fingertips until it looks like breadcrumbs
  3. Crack and egg in and form into a ball with your hands. Sloppy? Add more flour until it resembles what you think pastry looks like
Spray your muffin tin with oil spray (or grease with butter and some kitchen towel). Now rip the pastry into balls, flatten with your fingers and line the muffin tin with them

Slop the mixture in each one, sprinkle grated cheddar delicately on top and whack them in the oven until the cheese starts going brown where it's spilled over on the muffin tin. Also it should smell like Cheese On Toast (Americans, I believe you have something called a "grilled cheese". Use that as guidance)

Smells like the dishonour of a filthy
muffin tin

Smells like the glory that is Cheese On
Toast


Cool on a cooling rack and chow down.

Quiche just doesn't look good in photos.
Trust me that this is delicious.
I think it's the arbitrary bits of spring onion
that really make it sparkle.
NB: Both these things are amazing in bentos (lunchboxes). The quiches can be just wrapped up in tin foil and eaten as a hearty mid-morning snack. Go crazy.

Sunday, 1 April 2012

Monstrous Pavlova Sandwich


Making pavlova is ridiculously easy since most of the time is spent ignoring it. If you're making it for a party (at which it is an impressive yet inexpensive gift), make the bases the day before and whip the cream and assemble just before you go, so the meringue doesn't go soggy.


Ingredients:
8 egg whites (Don't be a pussy about this. Yes, it's a lot of egg whites, but leftover egg yolks are delicious. Make Crème Brulée, custard, lemon curd, or just double them up instead of a normal egg in cakes for added richness. Also, they freeze really well.)
450g caster sugar
2 tsp cider vinegar
2 tsp cornflour
1/2 tsp salt
400g berries
1 1/2 tubs double cream
1 tsp vanilla extract
1/2 cup icing sugar
Zest of 1 lemon
DEM PEAKS


Method:
1. Preheat the oven to 180C and grease two baking trays

2. Whisk the 8 glorious egg whites in a large bowl until they form stiff peaks when you take the whisk out. If you can see froth, they're not done

3. Stir in the sugar a couple of tablespoons at a time, and give it a good whisk in between. Observe how your meringue mix now has a soft shine to it. Fancy meringue


Now: creamy and delicious

4. Remove the whisk altogether and stir in the salt, cornflour and vinegar by hand. The vinegar will make them a little bit chewy at the bottom

5. Flop the meringue in two large circles on the baking trays. Make one flat, and one textured for the top

6. Put in the oven, and immediately turn the temperature down to 115C and set the timer for an hour and a half. Go and play outside


7. When the time is up, turn off the oven and ignore your pavlova some more until it's cool. Don't even take it out of the oven. This is seriously lazy baking

8. Whip up a tub and a half of double cream (or whipping cream, but not single cream. Don't even try, it's doomed to failure) with a teaspoon of vanilla essence, half a cup of icing sugar and some lemon zest

9. PAVLOVA PARTS, ASSEMBLE! Spread cream on pavlova base. Artfully arrange berries atop it. Somehow slide pavlova top onto it to create a delicious pavlova sandwich


10. Chow down
GLORIOUS PAVLOVA SANDWICH MOUNTAIN

Monday, 12 March 2012

Delicious home-made Lollipops

Takes: About an hour, not including wrapping up time

It is extremely difficult to show you care with gifts when you have no money. 
   
Therefore, you must substitute cost for hours of your time and potential danger. Lollipops are ideal, as they take a while, are a cutesy home-made version of a commercial thing, and the sugar could potentially leave you horrifically disfigured if it spills on you. Thus, the females in your life will go crazy for them.
Ingredients:
- 2 cups granulated sugar
- 2/3 cup corn syrup (though I used golden syrup as an alternative)
- 1 cup water
- 1/2 teaspoon cream of tartar
- 2 tsp orange flavouring
- A few drops red and yellow colouring
- 2 teaspoons

Utensils:
-Cup measure (come on people, we're dealing with boiling sugar here, are you sure you want to take the risk of just using your coffee mug?)
- Jam thermometer (I understand not everyone has these, but many mothers do. You're looking for a rural (if possible) middle-class, middle-aged woman. She or a friend of hers will have one and will be willing to lend)
- Saucepan
- Wooden spoon
- Baking tray
- 30-40 cocktail sticks with the pointy ends cut off (use scissors)

Method:
 1. Grease two baking trays and space out your makeshift lolly sticks on them

2. Heat all the things except the colouring and flavouring in a saucepan on a high heat- stir until the sugar dissolves
3. Stop stirring. Put on the highest possible heat until the mixture reaches 320 degrees Fahrenheit on your jam thermometer (about 10-15 minutes). Be aware that at this point, the boiling sugar harbours a deep hatred of you, your clothing and your skin, and will only maim you if you attempt to stir it. Also, that sugar burns like napalm. Fill the sink with a few inches of cold water

4. Once it's reached 320 degrees, take it off the heat and put it into the water to stop it from cooking and cool it down a little. Add 2 teaspoons of orange extract and whatever colouring suits your taste- Remember that Scarlet Red food colouring is in league with Boiling Sugar and will therefore stain your clothes, hair and work-surfaces irrecoverably
5. Put on a cooking rack or upturned pan on the work-surface (the sugar pan will probably melt your work-surface, it is still incredibly hot) near your baking tray
6. Using two teaspoons, plop a bit of mix on each lollystick, and give the stick a twist to make sure it doesn't just fall off when you pick it up. Use about half the mix.
NB: If the mixture is hot, it will suffer from middle-aged spread like a school secretary after Christmas and your lollies will be terrible. Wait for it to solidify slightly. If it gets too cold to use, just shove it back on the heat for a minute and start again


7. When cool (about 15 minutes), flip the lollies over and do the same on the other side so they're not disappointingly flat on the back
8. After a further 15 minutes, they're ready to eat. Wrap in greaseproof paper and string and stick in the fridge overnight to harden them up totally


Note: A Word on Wrapping
When presenting gifts of baking to women, always wrap in greaseproof paper and string. Not only is it inexpensive, it straddles the line between twee hipster and homely traditional, and is therefore suitable for a lass of any age or inclination.

I will add that while this is also appropriate for men, as it strikes of ruggedness and practicality, in my experience men are more concerned with the quantity of the food than how it is wrapped.


For the purposes of these lollies, the point is to stop them from sticking together, and also to use something that won't absorb the grease from the baking tray and make them look gross. Use baking paper, shiny side towards the lolly


 "Individually wrapped for extra daintiness"
Again, this adds towards showing the object of your affection that, despite having no money, you are prepared to go to ridiculous lengths to make their present utterly charming


These are takeaway trays that have been put in the dishwasher. Try to avoid giving gifts that require the awkward return of tupperware- it's not classy, nor does it feel special

Friday, 17 February 2012

Super Manly Pork Pies


"Manly" here means rustic (ugly), unhealthy and delicious.

Pork pies for the boyfriend's family- This variant has no 'jelly' between pie and crust, so they won't keep for as long as normal ones, but I think they're better like this. The recipe I use is here, but I make a couple of alterations which are as follows:
Components: Pork mix and hot water crust pastry
  • No anchovy paste, allspice or mace. Instead, 1/4 teaspoon ground cloves, 1 teaspoon mixed spice
  • More sage. Just over a tablespoon of finely chopped sage- gives it that really homely smell
  • For flour: 4oz plain baking flour, 4oz strong wholemeal bread flour, because it's nice to have a bit more substance to the crust
Tips:
  • Pack the meat tightly because it'll shrink a lot when cooking
  • Don't add too much flour when rolling out the pastry because it'll flake
  • If the pastry goes hard because it's cold, shove it in the microwave for a minute
  • Use a baking tin with straight sides or they'll look like middle-aged mince pies
  • They need longer than you think. As quite a girly girl, I am forever tempted to take pies out of the oven when they look pale and pretty, but this is not correct and will result in flaccid, undercooked pastry. When you're starting to look at them and think "Oh pork pies, life has not been kind to you", they are just about done. A good indicator is if you can put a nice thick layer of eggwash on before they go in and get a little pool of it on one side of one pie. When that turns sticky dark brown, and the meaty goodness is bubbling around the sides, they're done. I have included a disgusting close-up picture below to illustrate
  • Let them cool on a cooling rack in the pie dish. The sides will still be very flaccid because the lard is hot when they come out of the oven. When cool, put them in the fridge. Pork pies taste best after two days.
    Pork pies are hardy beasts, just wrap them in cling film and carry them in your bag for a man-sized snack/on the go meal.
PRIME example of the “Oh pork pies, life has not been kind to you” principle.
These pies on the left do not look nearly miserable enough to be taken out yet,whereas the chappy on the right is brown, crispy and delicious. Note difference in egg wash.


Note: I have never known an English
man to turn down a pork pie. Please
tell me in the comments if you ever
have, because I think I may be onto
something here.
(Also, did anyone else giggle when I said "pack the meat tightly"?)


Thursday, 16 February 2012

Banana, Walnut and Oat Breakfast Loaf

Well obviously there was more at one point, but my family ate it before I could take a picture...

This is breakfast loaf. It's a tea loaf, but contains breakfast things. It is easy, cheap and satisfying to bake. 
Here's the tea loaf tin. It's just a small loaf tin. You could just make muffins instead.

Ingredients
• 1 cup self-raising flour
• 1 cup strong wholemeal flour
• 1 cup porridge oats
• 1/2 cup light brown sugar
• 2 teaspoons baking powder
• 1 teaspoon salt
• 1 egg
• 3/4 cup milk
• 1/2 teaspoon vanilla extract
• 1/2 teaspoon ground nutmeg
• 1/2 teaspoon ground ginger
• 1/4 teaspoon cinnamon
• 2 mashed bananas
• 3/4 cup chopped walnuts

Method
1. Put all the dry things in a bowl
2. Put all the wet things in different bowl
3. Pour the wet things into the dry things between intervals of mixing
4. Pour the delicious fragrant mixture into a tea-loaf tin (see picture) or about 12 cupcake liners- Only fill 3/4 of the way up to allow for rising
5. Bake at 205 degrees C (400 degrees F) for 25 minutes. Check after 15 minutes, and then just keep cooking until a skewer comes out clean from the middle.

Consume for breakfast with butter to ensure an amazing day.


Inside: Delicious.